
Queries …
cont.A list of options appears, click on the second option from the top, which is Simple Query Wizard and press OK.


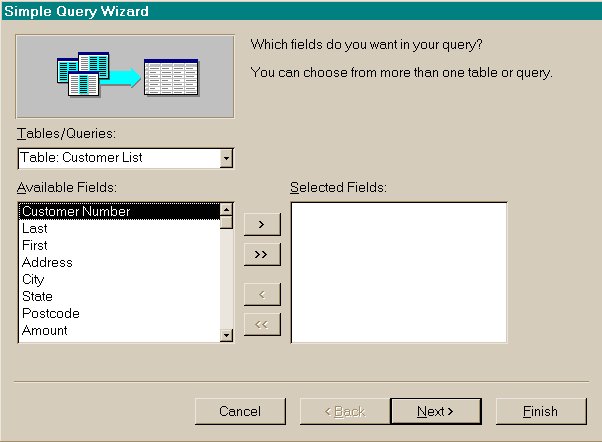
The Simple Query Wizard appears. At this point, you select any fields for display in any order. You can also choose more than one table, if so desired.
Click First in the Available Fields list box, and click the > button
Click Last in the Available Fields list box, and click the > button
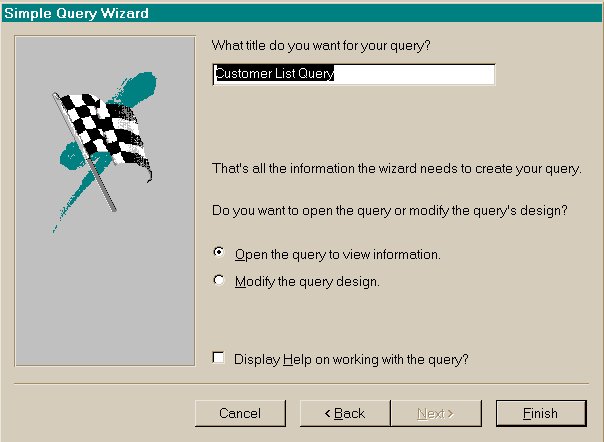 Click the Next button, where you will be asked to title your Query and specify whether you would like to view the query's information or modify its design. Normally, you assign a query name that indicates what the query displays. For now, accept the default query name and view its contents.
Click the Finish button.
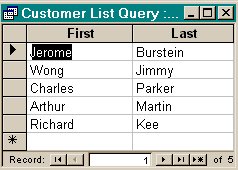 The result of a query is called a dynaset, which looks and acts like a table but which is really a selection of data in an underlying table. Changes made to the dynaset are passed on to the table, so you can edit the records your queries find.
The query procedure can also search for selected field values and perform mathematical calculations on number fields.
To close the dynaset, click on the X button at the top of the window. You will now be taken to the Object window, where you will notice that a query icon named Customer List Query appears in the Queries tab.
A simple query restricts the fields shown in the dynaset but does not limit the number of records selected from the Customer table. By adding a conditional expression to the query, you can instruct Access to select only those records that meet the stated condition (criterion).
Conditional selections fall into a number of categories. You can select records that match criteria exactly, fall within an acceptable range of values, fit a pattern, come close to selection values, or are unlike the selection criteria entirely. You can also combine criteria, depending on your needs.
To select records with field values that match a particular value, you simply place the fields you want displayed in the dynaset using a drag and drop method and then type the desired value in the criteria row of the appropriate field column. Any record that matches the query (or search) criteria will be selected. For example you want to display the name and address information about those customers whose state is "Vic":
In the Queries tab, click the New button, Design View (which is the first option and highlighted by default), and then OK.
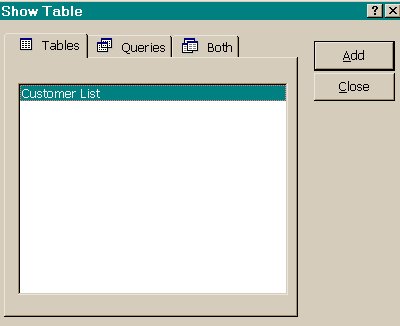 The Show Table dialog box appears. This dialog box has three tabs: Tables, Queries, and Both. These tabs are for selecting tables, queries, or both tables and queries for use in a query. Once selected, the fields from the selected tables/queries will be used in the query. For now select only the Customer List table.
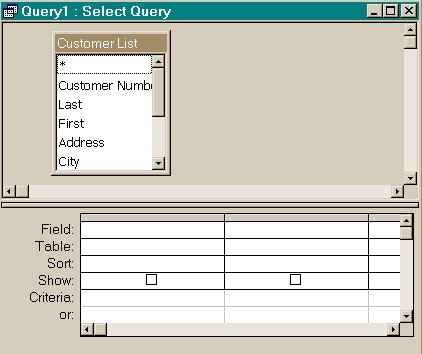 Click Customer List in the Tables tab and then the Add button. Click the Close button in the Show Table dialog box. Your screen should now have the Query design window with the list of fields from the Customer List Table in the upper section.
Click the Last field in the Customer List box in the upper section of the Query window. Drag the Last field into the Field row of the first column of the lower section (grid). Click the First field in the Customer List box in the upper section of the Query window. Drag the First field into the Field row of the second column of the lower section. Use the Customers List box's scroll bar to display both City and State fields. Click the City field, and then Shift+Click the State field to select them both. Drag the selection to the Field row of the third column of the lower section. You can also double-click a field to insert it into the query.
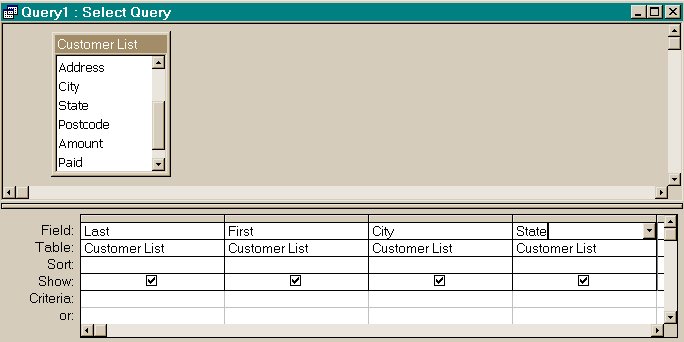
So far, you've simply identified the field columns that will appear in the answer. Now, you can restrict the records that will appear by specifying the search criteria as follows:
 In the State column, click the Criteria cell, and then type Vic
![]() Click on Query (from the File menu), Run. Or you can click on the red exclamation mark on the toolbar, to produce the answer you require.
Click on Query (from the File menu), Run. Or you can click on the red exclamation mark on the toolbar, to produce the answer you require.
The result should resemble the figure below:
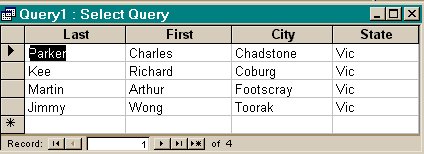 You can save the Query, by clicking on the X button in the query window. Save it as Victoria. You will now notice that you have two queries listed in the object window.
Now that you are familiar with the simple query design technique, perhaps you could experiment with a few more queries from within the queries that you have just created.
Our next exercise will be a bit more on queries and then you will start creating reports.
|
Top of the page |
To the Previous page |
To Next page |
To the Main page |