The tools

The Photoshop Toolbox shows only 20 of its 33 tools at any one time. The other tools are hidden inside pop-up menus. Any tool icon that includes a tiny right pointing triangle harbors a pop-up menu with one or more alternate tools. You can also Alt+click a tool icon to switch to the next tool in the pop-up menu.
Also, when you hover your cursor over a tool, Photoshop tells you the name of the tool, and how to select it from the keyboard. For example, marquee tool (M) means that you can press the M key to get the marquee tool. ![]()
The following description is to be used as a reference to get acquainted with the program, each of the following descriptions tells how to use the tool inside the Image window. For example, if an item says drag, you click the tool's icon to select the tool, and then drag in the Image window; you don't drag on the tool icon itself.
One at a time
![]() Rectangular marquee: Drag with this tool to enclose a portion of the image in a rectangular marquee, which is a pattern of moving dash, marks indicating the boundary of a selection.
Rectangular marquee: Drag with this tool to enclose a portion of the image in a rectangular marquee, which is a pattern of moving dash, marks indicating the boundary of a selection.
![]() Elliptical marquee: Drag with the elliptical marquee tool to enclose a portion of the window in an oval marquee.
Elliptical marquee: Drag with the elliptical marquee tool to enclose a portion of the window in an oval marquee.
![]() Single-row marquee: Click with the single-row marquee to select an entire horizontal row of pixels that stretches all the way across the image. You can also drag with the tool to position the selection. Not commonly used.
Single-row marquee: Click with the single-row marquee to select an entire horizontal row of pixels that stretches all the way across the image. You can also drag with the tool to position the selection. Not commonly used.
![]() Single-column marquee: Same as the single-row marquee, except the single-column marquee selects an entire vertical column of pixels.
Single-column marquee: Same as the single-row marquee, except the single-column marquee selects an entire vertical column of pixels.
![]() Crop: Drag with the crop tool to enclose the portion of the image you want to retain in a rectangular boundary. The crop boundary has several square handles, which are handy to resize the cropped area.
Crop: Drag with the crop tool to enclose the portion of the image you want to retain in a rectangular boundary. The crop boundary has several square handles, which are handy to resize the cropped area.
Drag outside the boundary to rotate it. Drag inside the boundary to move it. Press Enter to crop away the portions of the image that lie outside the boundary; press Escape to cancel.
![]() Move: Drag to move the selected portion of an image. If no portion of the image is selected, dragging with the move tool moves the entire layer.
Move: Drag to move the selected portion of an image. If no portion of the image is selected, dragging with the move tool moves the entire layer.
The move tool is the exclusive means for moving and cloning selected portions of an image.
![]() Lasso: Drag with the lasso tool to select a free-form portion of the image. You can also Alt+click with the lasso to create a straight-sided selection outline.
Lasso: Drag with the lasso tool to select a free-form portion of the image. You can also Alt+click with the lasso to create a straight-sided selection outline.
![]() Polygonal lasso: Click with this tool to draw a straight-sided selection outline. Each click sets a corner point in the selection.
Polygonal lasso: Click with this tool to draw a straight-sided selection outline. Each click sets a corner point in the selection.
![]() Magic Wand: Click with the magic wand tool to select a continuos area of similarly colored pixels. To select discontigous areas, click in one area and then Shift+Click in another.
Magic Wand: Click with the magic wand tool to select a continuos area of similarly colored pixels. To select discontigous areas, click in one area and then Shift+Click in another.
![]() Airbrush: Drag with the airbrush tool to spray diffused strokes of color that blend into the image, just the thing for creating shadows and highlights.
Airbrush: Drag with the airbrush tool to spray diffused strokes of color that blend into the image, just the thing for creating shadows and highlights.
![]() Paintbrush: Drag with the paintbrush tool to paint soft lines, which aren't as jagged as those created with the pencil, but are not as fluffy as those created with the airbrush.
Paintbrush: Drag with the paintbrush tool to paint soft lines, which aren't as jagged as those created with the pencil, but are not as fluffy as those created with the airbrush.
![]() Eraser: Drag with the eraser tool to paint in the background color or erase areas in a layer to reveal the layers below. Alt+drag to access the magic eraser, which changes portions of the image back to the way they appeared when last, saved.
Eraser: Drag with the eraser tool to paint in the background color or erase areas in a layer to reveal the layers below. Alt+drag to access the magic eraser, which changes portions of the image back to the way they appeared when last, saved.
Four styles of eraser exist - paintbrush, airbrush, pencil, and square. You can move through them by Alt+clicking the eraser tool icon in the Toolbox.
![]() Pencil: Drag with the pencil tool to paint jagged lines.
Pencil: Drag with the pencil tool to paint jagged lines.
![]() Rubber stamp: The rubber stamp tool serves many functions, but is usually used to copy one portion of the image onto another. Alt+click the part of your image you want to clone, and then drag to clone that area to another portion of the image.
Rubber stamp: The rubber stamp tool serves many functions, but is usually used to copy one portion of the image onto another. Alt+click the part of your image you want to clone, and then drag to clone that area to another portion of the image.
You can also use the rubber stamp tool to paint with a pattern or to change portions of an image to the way they looked when last saved. Go through the seven different alternative settings, Alt+click the rubber stamp tool icon in the Toolbox.
![]() Smudge: Drag with this tool to smear colors inside the image.
Smudge: Drag with this tool to smear colors inside the image.
![]() Blur: Drag with the blur tool to diffuse the contrast between neighboring pixels, which blurs the focus of the image. You can also Alt+drag to sharpen the image.
Blur: Drag with the blur tool to diffuse the contrast between neighboring pixels, which blurs the focus of the image. You can also Alt+drag to sharpen the image.
![]() Sharpen: Drag with this tool to increase the contrast between pixels, which sharpens the focus. Alt+drag when this tool is active to blur the image.
Sharpen: Drag with this tool to increase the contrast between pixels, which sharpens the focus. Alt+drag when this tool is active to blur the image.
![]() Dodge: Drag with the dodge tool to lighten pixels in the image. Alt+drag to darken the image.
Dodge: Drag with the dodge tool to lighten pixels in the image. Alt+drag to darken the image.
![]() Burn: Drag with the burn tool to darken pixels. Alt+drag to lighten.
Burn: Drag with the burn tool to darken pixels. Alt+drag to lighten.
![]() Sponge: Drag with the sponge tool to decrease the amount of saturation in an image so the colors appear dimmer and, eventually, gray. You can also increase color saturation by changing the setting of the first pop-up menu in the Toning Tool Options palette from Desaturate to Saturate.
Sponge: Drag with the sponge tool to decrease the amount of saturation in an image so the colors appear dimmer and, eventually, gray. You can also increase color saturation by changing the setting of the first pop-up menu in the Toning Tool Options palette from Desaturate to Saturate.
![]() Pen: Click and drag to set points in the Image window, much like an outline for a path.
Pen: Click and drag to set points in the Image window, much like an outline for a path.
![]() Direct selection: sometimes referred to as the arrow tool. This tool is used to edit a path drawn with the pen tool. You can drag points or control handles. Alt+click a path to select all its points and move the path as a whole.
Direct selection: sometimes referred to as the arrow tool. This tool is used to edit a path drawn with the pen tool. You can drag points or control handles. Alt+click a path to select all its points and move the path as a whole.
![]() Insert point: Click a segment with this tool to insert a point in the path.
Insert point: Click a segment with this tool to insert a point in the path.
![]() Remove point: Click a point to remove the point without interrupting the outline of the path. Photoshop automatically draws a new segment between the neighboring points.
Remove point: Click a point to remove the point without interrupting the outline of the path. Photoshop automatically draws a new segment between the neighboring points.
![]() Convert point: Points in a path come in different varieties, some indicating corners and others indicating smooth arcs. The convert point tool enables you to change one kind of point to another. Drag a point to convert it from a corner to an arc. Click a point to convert it from an arc to a sharp corner.
Convert point: Points in a path come in different varieties, some indicating corners and others indicating smooth arcs. The convert point tool enables you to change one kind of point to another. Drag a point to convert it from a corner to an arc. Click a point to convert it from an arc to a sharp corner.
![]() Type: Click with the type tool to display the Type Tool dialog box, which enables you to enter and format text. You can not use the type tool to edit existing text as you would in page-layout or drawing program.
Type: Click with the type tool to display the Type Tool dialog box, which enables you to enter and format text. You can not use the type tool to edit existing text as you would in page-layout or drawing program.
Text is created on a new layer. This way you can edit the text and adjust the letter spacing using the selection tools without harming other parts of the image.
![]() Type mask: As with the standard type tool, clicking with the type mask tool brings up the Type Tool dialog box. But when you exit the dialog box, Photoshop creates the letters as transparent selection outlines. If you don't want to add a new layer, this is the type tool to use.
Type mask: As with the standard type tool, clicking with the type mask tool brings up the Type Tool dialog box. But when you exit the dialog box, Photoshop creates the letters as transparent selection outlines. If you don't want to add a new layer, this is the type tool to use.
![]() Line: Drag with the line tool to create a straight line. Click the Start or End option in the Line Tool Options palette to add arrowheads, if needed.
Line: Drag with the line tool to create a straight line. Click the Start or End option in the Line Tool Options palette to add arrowheads, if needed.
![]() Gradient: Drag with this tool to fill a selection with a gradual transition of colors, commonly called a gradient. By default, the gradient fades from the foreground color to the background color. But in Photoshop, you can create custom gradients by clicking the Edit button in the Gradient Tool Options palette.
Gradient: Drag with this tool to fill a selection with a gradual transition of colors, commonly called a gradient. By default, the gradient fades from the foreground color to the background color. But in Photoshop, you can create custom gradients by clicking the Edit button in the Gradient Tool Options palette.
![]() Paint bucket: Click with the paint bucket tool to fill a continuos area of similarly colored pixels with the foreground color or a predefined pattern.
Paint bucket: Click with the paint bucket tool to fill a continuos area of similarly colored pixels with the foreground color or a predefined pattern.
![]() Eyedropper: Click with the eyedropper tool on a color in the Image window to make that color the foreground color. Alt+click a color in the image to make that color the background color.
Eyedropper: Click with the eyedropper tool on a color in the Image window to make that color the foreground color. Alt+click a color in the image to make that color the background color.
![]() Hand: Drag an image with the hand tool to scroll the window so you can see a different portion of the image. Double-click the hand tool icon to magnify or reduce the image so it fits on the screen in its entirety.
Hand: Drag an image with the hand tool to scroll the window so you can see a different portion of the image. Double-click the hand tool icon to magnify or reduce the image so it fits on the screen in its entirety.
![]() Zoom: Click with the zoom tool to magnify the image so you can see individual pixels more clearly. Alt+click to step back from the image and take in a broader view. Drag to enclose the specific portion of the image you want to magnify. Double click the zoom tool icon to restore the image to 100 percent view size.
Zoom: Click with the zoom tool to magnify the image so you can see individual pixels more clearly. Alt+click to step back from the image and take in a broader view. Drag to enclose the specific portion of the image you want to magnify. Double click the zoom tool icon to restore the image to 100 percent view size.
The Toolbox controls
The following list explains the controls at the bottom of the Toolbox.
![]() Foreground color: Click the foreground color icon to bring up the Color Picker dialog box. Select a color and press Enter to change the foreground color, which is used by all painting tools except the eraser.
Foreground color: Click the foreground color icon to bring up the Color Picker dialog box. Select a color and press Enter to change the foreground color, which is used by all painting tools except the eraser.
The foreground color icon indicates the color you apply when you use the type, paint bucket, line, pencil, airbrush, or paintbrush tool, or if you Alt+drag with the smudge tool. The foreground color also begins any gradation created with the gradient tool. You can apply the foreground color to a selection by choosing Edit, Fill or Edit, Stroke or by pressing Alt+Backspace. To change the foreground color, click the foreground color icon to display the Color picker dialog box, select a new color in the Color palette, or click an open image window with the eyedropper tool.
Many users make the mistake of double-clicking the foreground or background color icons when they first start using Photoshop. A single click is all that's needed.
![]() Background color: Click the background color icon to display the Color picker and change the background color, which is used by the eraser and gradient tools. Photoshop also uses the background color to fill a selected area on the background layer when you press the Delete key.
Background color: Click the background color icon to display the Color picker and change the background color, which is used by the eraser and gradient tools. Photoshop also uses the background color to fill a selected area on the background layer when you press the Delete key.
The active background color indicates the color you apply with the eraser tool. The background color also ends any gradation created with the gradient tool. To change the background color, click the background color icon to display the Color palette or Alt+click any open image window with the eyedropper tool. You can also use the Ctrl+Backspace to fill a selection with the background color instead.
![]() Switch colors: Click the switch colors icon to exchange the foreground and background colors.
Switch colors: Click the switch colors icon to exchange the foreground and background colors.
![]() Default colors: Click this icon to change the foreground color automatically to black and the background color to white.
Default colors: Click this icon to change the foreground color automatically to black and the background color to white.
![]() Marching ants: Click this icon to exit Photoshop's quick mask mode and view selection outlines as animated dotted lines that look like marching ants, hence the name. Photoshop calls it the standard mode.
Marching ants: Click this icon to exit Photoshop's quick mask mode and view selection outlines as animated dotted lines that look like marching ants, hence the name. Photoshop calls it the standard mode.
![]() Quick mask: Click here to enter the quick mask mode, which allows you to edit selection boundaries using painting tools. The quick mask mode is too complex a topic to sum up in a few sentences. At a beginner stage you will probably not get to use this function.
Quick mask: Click here to enter the quick mask mode, which allows you to edit selection boundaries using painting tools. The quick mask mode is too complex a topic to sum up in a few sentences. At a beginner stage you will probably not get to use this function.
![]() Standard window: Click this icon to display the foreground image in a standard window. By default, every image opens in the standard window mode.
Standard window: Click this icon to display the foreground image in a standard window. By default, every image opens in the standard window mode.
![]() Full screen with menu bar: If you cannot see enough of your image inside a standard window, click this icon. The Title bar and scroll bars disappear, as do all background windows and the Windows 95/98 taskbar, but the menu bar and palettes (if open) remain visible.
Full screen with menu bar: If you cannot see enough of your image inside a standard window, click this icon. The Title bar and scroll bars disappear, as do all background windows and the Windows 95/98 taskbar, but the menu bar and palettes (if open) remain visible.
You can still access other open images by choosing their names from the Window menu. A light gray background fills any empty area around the image.
![]() Absolute full screen: If you still cannot see enough of your image, or the light gray area in the image is too distracting, click the rightmost of the Image window icons to see the photo set against a neutral black background. The menu bar disappears, limiting your access to commands, though you can still choose some commands using keyboard shortcuts. Only the toolbar and palettes (if open) remain visible. If the palettes get in your way, you can hide all palettes, including the Toolbox, by pressing the Tab key. To bring the Toolbox back into view, press Tab again.
Absolute full screen: If you still cannot see enough of your image, or the light gray area in the image is too distracting, click the rightmost of the Image window icons to see the photo set against a neutral black background. The menu bar disappears, limiting your access to commands, though you can still choose some commands using keyboard shortcuts. Only the toolbar and palettes (if open) remain visible. If the palettes get in your way, you can hide all palettes, including the Toolbox, by pressing the Tab key. To bring the Toolbox back into view, press Tab again.
Color Picker & Modes
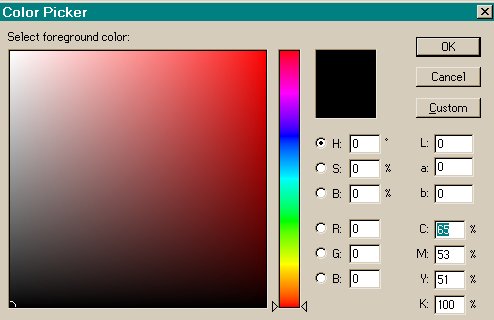
When you click the foreground or background color icon, Photoshop displays the Color Picker dialog box.
Use the color slider to home in on the color you want to select. Drag up or down on either of the slider triangles to select a color from a particular range. The colors represented inside the slider correspond to the selected radio button.
The color field shows a range of variations on the current slider color. Click inside it to move the color selection marker and, a new color.
The color currently selected from the color field appears in the top rectangle immediately to the right of the color slider. Click the OK button or press Enter to make this the current background or foreground color.
The bottom rectangle to the right of the color slider shows how the foreground or background color, whichever one you are in the process of editing, looked before you displayed the Color picker dialog box. Click the Cancel button or press Escape to leave this color intact.
The four sets of option boxes inside the Color Picker dialog box represent color models. Rather than discussing the color models in the order in which they appear, we would like to discuss the most widely accepted color model, RGB.
RGB is the color model of light, RGB comprises three primary colors, red, green and blue. The RGB model is also called the additive primary model, because a color becomes lighter as you add higher levels of red, green, and blue light.
As far as image editing is concerned, the RGB color model is ideal for editing images onscreen because it provides access to the entire range of 24-bit screen colors. Furthermore you can save an RGB image in every file format supported by Photoshop, except GIF.
Shortcuts and Modifiers
Shortcuts enable you to initiate operations without resorting to the laborious task of choosing commands from menus or clicking some tool icon until your arm falls off. Photoshop lists keyboard equivalents for its commands next to the command in the menu. You can choose File, New by pressing Ctrl+N, choose Edit, and Undo by pressing Ctrl+Z, choose Select, All by pressing Ctrl+A, choose Select, None by pressing Ctrl+D, and so on.
Alt+key combos: As in other Windows programs, you can also choose commands using the so called hot keys, which are the underlined letters you see in the menu, command, and dialog box option names. To access a menu or dialog box option, press Alt plus the underlined letter in the menu or option name. To choose a command from a menu you can simply press the hot key, no Alt key required.
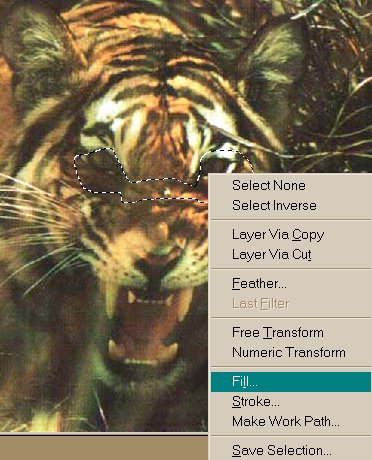
Right-clicking: Right-click in the Image window. Up pops a menu of commands. For example, if you right-click with the lasso tool while a selection is active, you get a list of commands relative to your current need. Although you can apply other commands to a selection, these commands are some of the most common.
The right click pop-up menu is context-sensitive, which means it changes to suit the active tool and the current state of the image (selected or not). You can also right click items such as brushes and layers in the palettes.
Toolbox shortcuts: Photoshop lets you select tools from the keyboard. This way, you can use one tool, press a key, and immediately start in with another tool without losing your place in the image. Best of all, the shortcuts work even when the Toolbox is hidden. To activate a tool, you don't need to press any Ctrl, Alt or other keys. The following table illustrates what tools will be activated when you press that key. The listing is not alphabetical; neither are the tools listed in that manner in the program, come to think of it!
|
M = Marquee tool |
C = Crop |
V = Move |
|
L = Lasso tool |
W = Magic Wand |
A = Airbrush |
|
B = Paintbrush |
E = Eraser |
Y = Pencil |
|
S = Rubber stamp |
U = Smudge |
R = Blur |
|
O = Dodge tool |
P = Pen |
T = Type tool |
|
N = Line |
G = Gradient |
K = Paint bucket |
|
I = Eye dropper |
H = Hand |
Z = Zoom |
The following table lists the shortcut keys for the lower section of the toolbox.
|
X = Shift between Foreground & background colors |
D = Default colors |
Q = Quick mask mode |
F = From one window mode to the next |
Back to the
Top