Create, Open, Duplicate, and Save Images
Before you can work on an Image in Photoshop, whether you're creating a brand new image or opening an Image from disk, you must first load the Image into an Image window. The following are some of the basic ways to create an Image window:
File - New: Create a new window by choosing File, New (Ctrl + N). After you fill out the desired size and resolution specifications in the New dialog box, Photoshop presents you with a white empty canvas. It could be a different color, but if you have white as the background color, then white it shall be.
File - Open: Open an image saved to disk or CD-ROM by choosing File - Open (Ctrl+O). You can open images scanned in other applications, images purchased from photo agencies, slides and transparencies, or an image you previously edited in Photoshop.
Edit - Paste: Photoshop automatically adapts a new Image window to the contents of the Clipboard as long as they are in an image format. If you copy an image inside a different application or in Photoshop, and then choose File - New, Photoshop enters the dimensions and resolution of the Image into the New dialog box. All you must do is accept the settings and choose Edit - Paste (Ctrl+V) to introduce the image into a new window. This technique is useful for testing filtering effects on a sample of an image without harming the original.
Creating a new Image
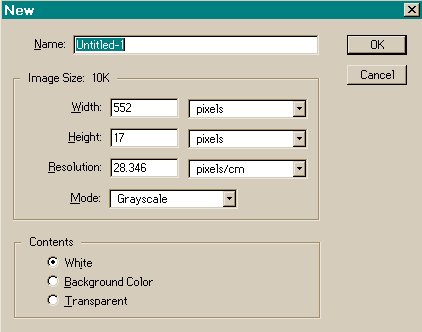
Whether you're creating an image from scratch or transferring the contents of the Clipboard to a new Image window, choose File - New or press Ctrl+N to bring up the New dialog box (shown on the side). If the Clipboard contains an Image, the Width, Height, and Resolution option boxes show the size and resolution of this Image. Otherwise, you can enter your own values in one of five units of measurement: pixels, inches, centimeters, picas, or points. If you're uncertain exactly what size image you want to create, enter a rough approximation. You can always change your settings later.
Although Photoshop matches the contents of the Clipboard by default, you can also match the size and resolution of other images:
Press Alt when choosing File - New, or press Ctrl+Alt+N to override the contents of the Clipboard. Photoshop displays the size and resolution of the last image you created, whether or not it came from the Clipboard. Use this technique when creating many same-sized images in a row.
You can also match the size and resolution of the new image to any other open image. While the New dialog box is open, choose the name of the image you want to match from the Window.
Units of measure: The Width and Height pop-up menus contain the five common units of measure. You can change the default unit of measure that appears in the Width and Height pop-up menus by pressing Ctrl+K, Ctrl+5, and selecting a different option from the Units pop-up menu.
Image size: In most cases, the onscreen dimensions of an image depend on your entries in the Width, Height, and Resolution option boxes. If you set both the Width and Height values to 5 inches and the Resolution to 72ppi, the new image will measure 720x720 pixels. The exception occurs if you choose pixels as your unit of measurement. In that case the onscreen dimensions depend solely on the Width and Height options, and the Resolution value determines the size at which the image prints.
Color mode: Use the Mode menu to specify the number of colors that can appear in your image. Choose Bitmap to create a black-and-white image and choose Grayscale to access only gray values. RGB Color, CMYK Color, and Lab Color all provide access to the full range of 16 million colors. RGB stands for red-green-blue. CMYK for cyan-magenta-yellow-black, and Lab for luminosity and two abstract color variables; a and b. It is safer for the moment to stick to RGB at this stage.
Background color: The New dialog box also provides three Contents radio buttons that enable you to change the color of the background for the new image. You can fill the new image with white, with the current background color (if it is something other than white), or with no color at all. The last setting, Transparent, results in a floating layer with no background image whatsoever, this can be handy when you have to edit layers separately. For the moment stick to either background or white.
What's in a name: The New dialog box provides a Name option. If you know what you want to call your new image, enter the name now. If you don't, it won't really matter, because when you choose File - Save, Photoshop asks you to specify the location of the file and confirm the file's name. The only reason for this option is to help you keep your files organized onscreen, especially if you have more than one open.
Opening an Image
If you want to open an image stored on disk, choose File - Open or press Ctrl+O to display the Open dialog box. The Open dialog box behaves just like the ones in other Windows applications, with a folder pop-up menu, scrolling list of files, and other standard navigation options. Photoshop's Open dialog box opens a thumbnail preview of the selected image. The thumbnail appears at the bottom of the dialog box. Beneath the thumbnail, Photoshop shows the file size of the image.
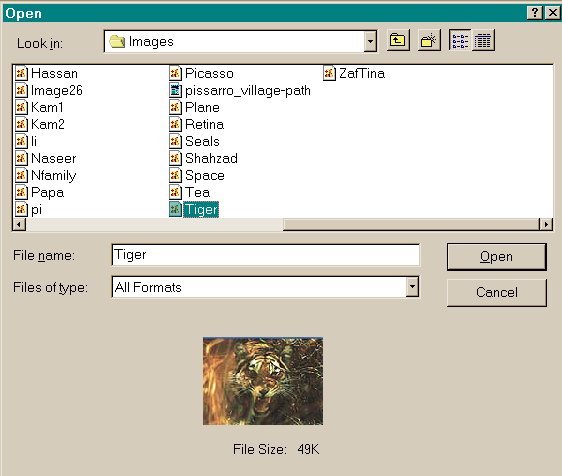
A preview appears, however, only if the Save Thumbnail check box was selected in the Save As dialog box when the image was first saved to disk.
Duplicating an Image
If you want to work on an image and try an effect, chances are the first time around you may not be happy with your results, so you would want to try again, and possibly again, until you get it just right. This is when duplicating an existing image to try out that special effect comes in handy.
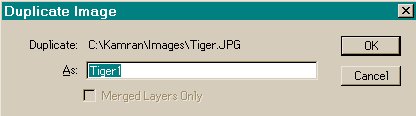
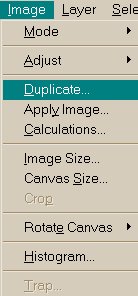
To create a new window with an independent version of the foreground image, choose Image - Duplicate. A new dialog box appears, requesting a name for the new image.
You can choose to ignore this message. If you're happy to let Photoshop automatically name your image and you don't care what it does with the layers, press Alt while choosing Image - Duplicate. This bypasses the Duplicate Image dialog box and immediately creates a new window.
Saving to disk
The first rule of storing an image on disk is to save it frequently. If the foreground image is untitled, as it is when you work on a new image, choosing File - Save (Ctrl+S) displays the Save dialog box, enabling you to name the image, specify its location on disk, and select a file format. Avoid using long filenames unless you're certain you won't be sharing the image with someone who doesn't use Windows 95/98.
If you are finally satisfied with your results, and want to publish on the Web, then you would obviously prefer a file format which would be supported by the millions of Web browsers out there. Unfortunately, the native file format the psd is not supported by the Web browsers out there. In order to make it so that everyone can see your masterpiece. Choose the Save a copy which is within the File menu. This will enable you to choose the format you prefer, usually JPEG or GIF. There is a bit more information in the section titled File Formats, which discusses the different ways you can save the file using the different file formats available. If you want to create graphics exclusively for the Web, then, may I suggest that you also have a look at the section titled Graphics for the Web.
After you save the image once, choosing the Save command updates the file on disk without bringing up the Save dialog box. Be sure to check the Save Thumbnail option box if you want to view a thumbnail of your image in the Open dialog box. Be aware though that this may increase the size of your image.
Back to the
Top