Using Text
Type and graphics are the same thing. Your computer treats each character in a word as a little picture. The letter O, for example, is a big black oval with a smaller transparent oval set inside it. The only difference between a character of type and a standard graphic is that you don't have to draw type; every letter is already drawn for you. So a font is like a library of clip art you can access from the keyboard.
Photoshop treats type like any other collection of pixels in an image. Type legibility is dependent upon the size and resolution of your image.
You can change the translucency of type by using the Opacity slider bar in the Layers palette. By using this technique, you can merge type and images to create subtle overlay effects.
The disadvantages of using type in a painting program. The resolution of the type is fixed. Rather than match the resolution of printed text to that of your printer, Photoshop prints type at the same resolution it prints the rest of the image.
Another bother is that when you type a line of text in an image, you can't return and add and delete characters from the keyboard as you can in a word processing program. If you have created a typo or want to rephrase the text, you must erase the offending characters or words and begin again.
Putting in text
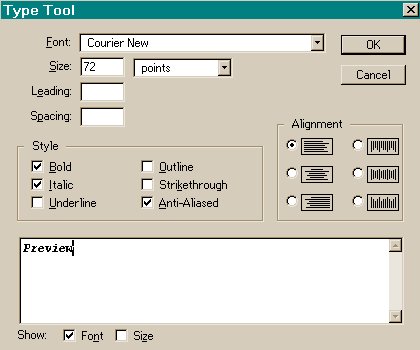
To create text, select the standard type tool, and click in the Image window. Photoshop displays the Type Tool dialog box. If you are using this option for the very first time, you may have to wait a minute or so, as Photoshop takes some extra time to build up a font library.
Photoshop positions the bottom of the text at the spot where you click with the type tool. If you drag with the type tool, you can reposition the type cursor onscreen. Release the button when your cursor is where you want the first character of type to appear. To create type in Photoshop, enter it into the Type Tool dialog box.
At the bottom of the Type Tool dialog box is the text-entry box. You enter and edit the text you want to add to the current image into this box.
You can edit text up to the moment you add it to the image. To make your edits, first select the characters you want to change by dragging over them with the cursor. Then enter new text from the keyboard. To select a whole word, double click it. You can also cut, copy, and paste text by choosing commands from the Edit menu or using keyboard equivalents.
If the text you are typing reaches the right edge of the text-entry box, the word in progress automatically drops down to the next line. When you click the OK button to exit the dialog box, though, all text appears on the same line unless you specifically entered carriage returns between lines (by pressing the Enter key). Each carriage return indicates the end of one line and the beginning of the next.
Get in the habit of clicking the OK button rather than pressing Enter to exit the Type Tool dialog box. You can press Enter to exit the dialog box when the Size, Leading, or Spacing option box is active, but Enter inserts a carriage return when the text-entry box is active.
After you exit the Type Tool dialog box, Photoshop puts your text on a new layer. If your text doesn't look the way you anticipated, press Ctrl+Z or click the trash can icon at the bottom of the Layers palette to delete the new layer. Then start the process over again by clicking with the type tool. When the Type Tool dialog box appears, your previous text is displayed in the text-entry box.
Within the text box there are two option groups you might like to experiment with, they are; Style & Alignment. Style lets you pick the way the text will look, i.e. Bold, italic, underline, etc. Alignment lets you choose the way your text will sit in the Image, it can be centered, right aligned, or left aligned.
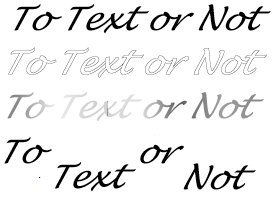
In the four lines of text on the right, the font size used is 32. The second line is an outline. The third line is filled in with gradient colors. The difference in the fourth line is that the individual words were selected with the Marquee tool, then were dragged, while the Ctrl key was pressed down.
Creating Effects
Photoshop has a second type tool. Known as the type mask tool, it creates character shaped selection outlines. You can switch to the type mask tool by pressing the T key when the standard type tool is active. Or select the T with the dotted line from the type tool pop-up menu in the Toolbox.
The following sections show you a few different ways to use the type mask tool, and without it.
Filling type with an image: one of the most straightforward applications for text in Photoshop is to use the character outlines to select a portion of an image.
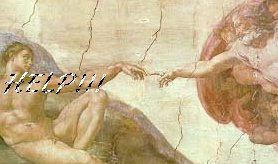
Open an image you want to put text into.
Create your text. Select the type mask tool in the Image window. Enter the text you want to use, format it as desired, and click Ok to display the outlines in the Image window. Large bold characters usually work best.

If your characters are not in position, then drag them into position, dragging with the type mask tool moves only the selection outline without affecting the image itself.
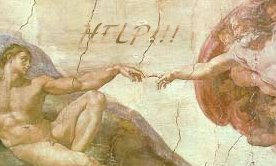

Ctrl+Alt+drag the selected characters to a new location. Or you can Ctrl+Drag the selection and drop it into a different image window to set the text against a new background. When you have dragged and dropped the text it may have still have the crawling ants' effect. To remove the effect, or deselect the option, press Ctrl+D.
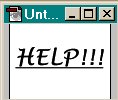
Adding shadows: create a new Image window large enough to accommodate a single line of large text. Create your text using the standard type tool. This technique involves filled type, so it's easier to use the standard type tool.
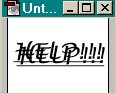
Once you have got the word or words, clone the new layer (cloning is dealt in a bit more depth in section 8). Drag the active layer name in the Layers palette onto the new layer icon at the bottom of the palette. The palette has three icons at the bottom, one for creating a new mask, the second one is for creating a new layer, the third one is for deleting a layer, depicted by the trash can. You do have the layers palette open, don't you? The layers palette is opened by clicking on the Window in the Menu bar scroll down to the option, Show Layers.
Nudge the shadow to offset it a few pixels. Press Ctrl+down arrow a few times and Ctrl+right arrow a few more times. Do not get carried away, only press a couple of times each for each of the keystrokes.
Press 4 on the keyboard. This will lower the opacity of the cloned selection to 40 percent. Even though the translucent clone resides above the original type, it looks like a drop shadow because both layer of type are the same color.
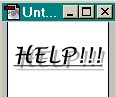
Remember that if the selection is still active for some reason, i.e. the crawling ants are around, you can deselect by pressing Ctrl+D, sit back and view your masterpiece. To give an added touch you could experiment with the gradient tool and see the effects.
Back to the
Top