Filters
Filters enable you to apply automated effects to an image. You can slightly increase the focus of an image, introduce random pixels, add depth to an image, or completely rip it apart. A number of special effects are made available via filters. For the statistical minded there are 47 filters available.
When you choose a command from the Filter menu, Photoshop applies the filter to the selected portion of the image. If no portion of the image is selected, Photoshop applies the filter to the entire image.
A word of caution just before you jump into trying filters. Filters are standardized special effects. Everyone who has access to Photoshop has access to these filters. If you rely on filters to edit your images for you, your audience will quickly recognise your work as just another run of the mill stuff, or at least unremarkable art.
What you need to be aware is that you have to be creative in creating your special effects. The next few pages will attempt to show you how the most important filters work, and offer some assistance in using them.
First of all filters are to be divided into two areas, corrective filters and destructive filters.
Two kinds
Corrective filters are tools you would use to modify scanned images and to prepare an image for printing or screen display. In most cases, the effects would be subtle enough that the viewer won't even notice you applied a corrective filter. Some of the corrective filters include changing the focus of an image, enhance color transitions, and fix the color of the neighboring pixels.
Destructive filters produce effects so dramatic, they can, if used improperly, completely overwhelm your artwork, making the filter more important than the image itself. Destructive filters are able to distort, pixelate, and render some remarkable light effects and clouds. Destructive filters are very popular with people who first start experimenting with Photoshop.
Focus & Contrast
By increasing the contrast between neighboring pixels, the sharpening filters enable you to compensate for image elements photographed or scanned slightly out of focus. The effect is similar to what you see when you adjust a camera to bring a scene into sharper focus.
The Sharpen, Sharpen More, and Sharpen Edges commands are easy to use and immediate in their effect. As described above Sharpen and Sharpen More affect whatever area of your image is selected. The Sharpen Edges filter, however, performs its sharpening operations only on the edges in the image. You can achieve better results and widen your range of sharpening options by practicing with the above mentioned filters, plus the Unsharp Mask filter.
The Unsharp Mask gives you both sharpening options. It can sharpen only the edges in an image or it can sharpen any portion of an image according to your exact specification, whether or not it finds an edge. It fulfills the exact purposes as the Sharpen, Sharpen Edges, and Sharpen More commands, but it is much more versatile. The Unsharp Mask dialog box is reachable by choosing Filter, Sharpen, and Unsharp Mask.
Line Drawing
If you wish to convert your image or photograph into something resembling a line drawing, then try the High Pass Filter (don't ask me why its called High Pass, they could have called it High Noon, as if I cared!). This gem is found in the Filters menu right down almost to the end, in the section called Other.
Once clicked the program offers a single option, the Radius value, which can vary from 0.1 to 250.0. This is how it works: High radius values distinguish area of high and low contrast only slightly. Low values change all high-contrast areas to dark gray and change all low-contrast areas to a slightly lighter gray.
The High Pass filter is especially useful as precursor to Image, Adjust, Threshold, which coverts all pixels in an image to black and white. The Threshold command produces entirely different effects on images before and after you alter them with the High Pass filter. In fact, applying the High Pass filter with a low Radius value and then issuing the Threshold command converts your image into a line drawing.
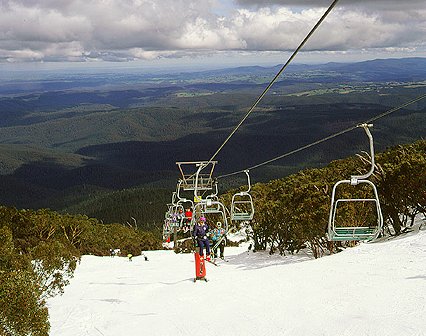
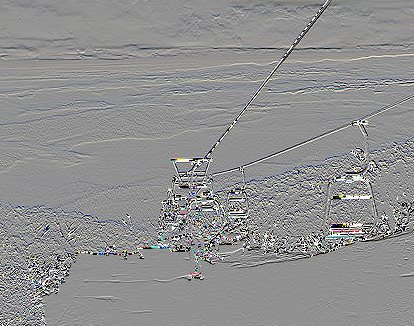
For instance the image on the right is as it should have been a ski lift and the valley beyond. A perfect picture you may say.
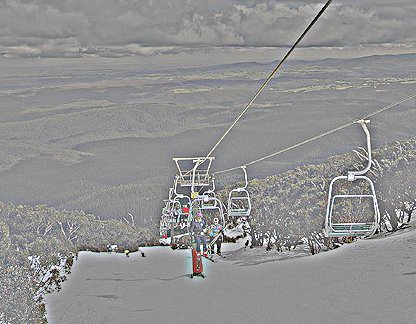
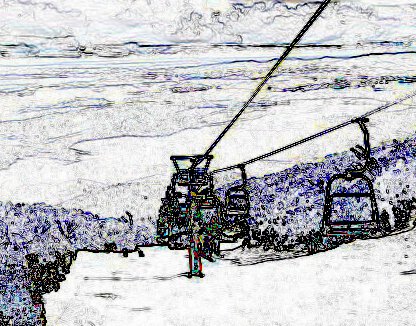
The next one has been High Passed (sorry, it was too good to pass). The radius value was 5.0.
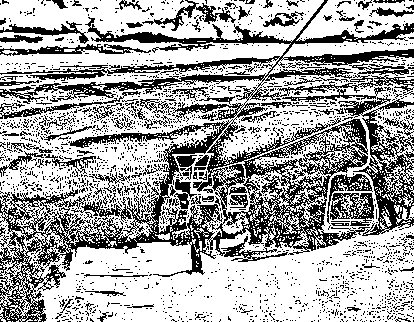
The third picture has gone through the Threshold command, with the value of about 125. The perfect picture has changed into a line drawing.
I always knew I had the talent!
Embossing
The Emboss filter works by searching for high-contrast edges, highlighting the edges with black or white pixels, and then coloring the low-contrast portions with medium gray. When you choose Filter, Stylize, Emboss, Photoshop displays the Emboss dialog box. This box has three options. Angle, Height, and Amount.
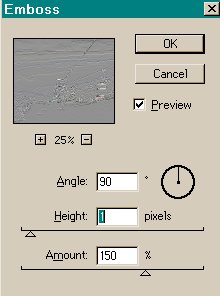
The value in the Angle option box determines the angle at which Photoshop lights the image. If you enter a value of 90 degrees, for example, you light the relief from the bottom straight upward.
The Emboss filter accomplishes its highlighting effect by displacing one copy of an image relative to another. You specify the distance between the copies using the Height option, which can vary from 1 to 10 pixels.
For the amount slider, enter a value between 1 and 500 percent, to determine the amount of black and white assigned to pixels along the edges. Values of 50 percent and lower produce almost entirely gray images. Together, the Height and Amount values determine the depth of the image.
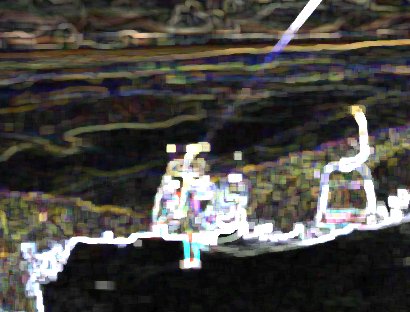
The image on the right has been subjected to an Emboss effect. The Angle was 90 degrees, the Height was 1 pixel, and the Amount was 150.
Tracing around edges
Photoshop has three filters that trace around pixels in your image to accentuate the edges, all located in the Filter, Stylize submenu.
Find Edges: this filter detects the edges similarly to High Pass. Low-contrast areas become white, medium-contrast edges become gray, and high-contrast edges become black. The image on the right was given the find edge treatment, the slider bar was set at 100. Set in this document, it does look like an impressionist painting, even if I say so myself!
Glowing Edges: this effect is a variation on the Find Edges with two important differences. Glowing Edges produces an inverted effect, changing low-contrast areas to black and edges to white. The filter also displays a dialog box that enables you to adjust the width, brightness, and smoothness of the traced edges.

Trace Contour: this effect is a little more involved in how it works, though it is slightly less interesting. In a nutshell, the filter traces a series of single-pixel lines along the border between light and dark pixels.
Spirals
The Twirl filter rotates the center of a selection while leaving the sides fixed in place. The result is a spiral of colors that looks as if you poured the image into a blender to a slow speed.
You choose the Twirl effect, by choosing Filter, Distort, and Twirl. You can see the magic happen when you start moving the slider bar. Move the slider bar to the right (positive value) and the image spirals in a clockwise direction. Move the slider bar to the left (negative value) and the image spirals in a counterclockwise direction. As you are probably aware, 360 degrees make a full circle, so the maximum 999-degree value equates to a spiral that circles around approximately three times.
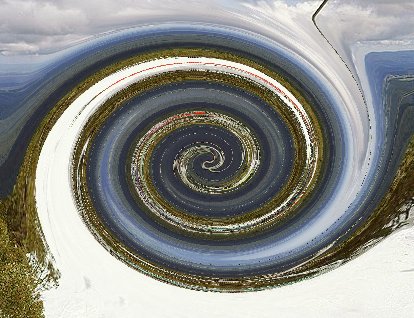
You could experiment with the idea, that if you twirl it around once to a 100 degrees, and then do it ten times, will you get a different looking image, then you would if you applied the twirl one time to 999 degrees? By the way the image on the right was applied the twirl to the max of 999 one time. Okay so I am lazy!
Creating a Droplet
Amongst other things, you could create a thick liquid droplet, using the twirl filter.
Open a new file, set the pixels at 100 by 100, the size is so that it is easy to manage.

Press the D key. This will ensure that the default foreground and background colors are selected.

Click on the gradient tool. Drag a distance in an angle, preferably from the top left-hand corner to the bottom right hand corner. Make sure you have the Gradient tool palette open (press Enter when the Toolbutton is pressed), set the Gradient option to Foreground to Background).
Choose the Twirl filter and apply it at -360 degrees so the spiral moves counterclockwise. Do this three times.

Now copy this layer to a new layer. Do this by making sure you have the layers palette open, the layer that you are working on will show it is active by being highlighted. Drag the layer down to the bottom of the palette where the icon for creating a new layer is. This creates a new layer, or rather duplicates the layer, since you choose to drag the existing layer.

With this new layer open: Choose Layer, Transform, Flip Horizontal.
Lower the Opacity value to 50 percent. Select the rectangular marquee tool and then press 5.
Choose Layer, Transform, Rotate 90 degrees CW. This rotates the layer a quarter turn.
In case you are wondering, CW is the abbreviation for Clockwise. You can achieve other interesting effects by choosing Lighten, Darken, and others from the brush modes pop-up menu. These transformations were produced using the black and white mode, imagine what you can do in color.
General Tips
Photoshop offers previewing capabilities such as Dialog box previews: all filters when initiated have a dialog box, which gives you a preview of what the image will look like once you have put in the filter to work.
To reapply the last filter used in the current Photoshop session, choose the first command from the Filter menu or simply press Ctrl+F. If you want to reapply the filter subject to different settings, Alt+choose the first Filter command or press Ctrl+Alt+F to redisplay that filter's dialog box.
Both techniques work even if you undo the last application of a filter. If you cancel a filter while in progress, however, pressing Ctrl+F or Ctrl+Alt+F applies the last uncancelled filter.
In many cases, you apply filters to a selection or image at full intensity, meaning you marquee an area using a selection tool, choose a filter command, enter whatever settings you deem appropriate if a dialog box appears, and sit back and watch the effects take place.
You might wonder, what is full intensity? Well, you can reduce the intensity of the last filter applied by choosing the Filter, Fade command or by pressing Ctrl+Shift+F. This command enables you to mix the filtered image with the original unfiltered one.
The sub-section above and the previous ones on Filters are just a smattering of what could be achieved if you apply the time and patience. Some of the ready made effects require no time, just imagination, which I am sure you would not lack when using Filters.
Back to the
Top